Breadcrumbs Navigation For Blogger

Breadcrumbs

Breadcrumb navigation helps your readers to track their position on your blog by showing a breadcrumb trail in this way (Home » Label Name » Post Title).This navigation appears just above of the your post title and the links are a trail from the homepage to post title.There is also option for showing the multiple labels in this navigation i.e. if any post have more than one label then it will show all of them.The original breadcrumbs idea is given by the HOCTRO and Aneesh of bloggerplugins futher worked on it.

Add Breadcrumbs Navigation To Blogger

  1. Go to Blogger Dashboard > Template 
  2. As always download a copy of your template 
  3. Click on Edit HTML 
  4. Hit Proceed 
  5. Now find below code:


just above it copy and paste below code


Now find below code (if you can two occurrences of this locate the second one)


just above it paste below code:


This code will only display the last label of the post in the breadcrumb. If you want to display all the labels, then you will have to remove the code in line number 16 and 18. Now find below code:

add below CSS code just above it


Save and Preview your change

HTML Editor


How To Post HTML Code In Blogger Comments Form?

PS: This Post is an experiment and not a new one

While writing tutorials or asking a question, sometimes it becomes very necessary to post html and javascript codes in your blog comment forms powered by Blogger. You have seen many authors posting HTML effectively but when some of you try to do it, you get an error. This is because Blogger Comment form doesn't support direct posting of HTML and JavaScript. In order to help you to do that we will need to change/encode the same code into a text and then post it effectively without any error. The Tool below will help you to change HTML characters to simple text, which could be easily inserted in your blogger template and comment form. You can also use it to convert your adsense code into an embeddable form. It converts special characters in this way,
  • '<' becomes '&lt;'
  • '>' becomes '&gt;'
  • '"' (double quote) becomes '&quot;'
  • ''' (single quote) becomes '&#039;'
  • '&' becomes '&amp;'
THE HTML ENCODER: Start Converting Now!

 
© Digital Pincher

Getting Access to Old Blogger-Style Templates

Getting Access to Old Blogger-Style Templates

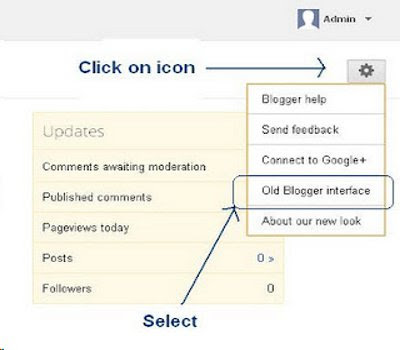
Blogger has developed cool new templates but there would be times that you want to return to the good old theme after changing it. The Wizz teaches you how you can access your old Blogger style template and reactivate it to your Blogger via this TUTORIAL.

Add A Smooth ‘Back to Top’ Button


Add A Smooth ‘Back to Top’ Button
There’s a plethora of tutorials out there that teaches you how to add a smooth ‘Back to Top’ button on your Blogger blog but most of them involves editing the HTML code of your current template, which I don’t like doing. That is why I chose the simplest method that Rahul from helperblogger.com and others like him used, and that is to make use of Blogger’s ‘Add a Gadget’ feature. You can find the tutorial for it HERE.

source: http://www.allblogtools.com/tricks-and-hacks/add-a-smooth-%E2%80%98back-to-top%E2%80%99-button/

Choosing Brilliant Images for Your Posts

Choosing Brilliant Images for Your Posts

Why read the book when there’s the movie available? Probably that’s what most people think in getting instant info about a topic so selecting an image for your post is essential in attracting more visitors in your blog and get them more interested.
An image is a useful tool to help your readers follow easily on what you’ve written, so here are some tips provided by James Adams to select the best image needed for your post.
  1. Relevance. Add images that are relevant to your post but don’t go overboard by adding pictures just for the sake of adding one. Make it straight forward just like the texts you’ve made.
  2. Copyright. Keep in mind that not all images are available for others to use. There are copyrights on the net and in print. To be safe, it’s better to use your own images or find one
That provides free use. There are sites that offer free use of images. If you will be using an image coming from another site, email or contact the owner and ask for permission to use.
  1. Editing. Edit your pictures before posting it. If the file is too large, make some adjustments. Having a clean image gets the point straight to your readers better than an unclear one. There are many great tools for editing an image, one is the popularly used Photoshop. There are also alternatives if you don’t have Photoshop. You can also use Gimp which is free.
  2. Avoid. Consider other user’s net speed connection, so you may try to avoid selecting images that may have loading factors. You don’t want your readers get turned off when browsing your site and it loads slowly because of some animated images.
  3. Include. You may have to include images that are better to use and have unique illustrations. Familiar image loses its weight since people have seen it already on other sites, so look for something that associates well and relevant with your work.

========================================================================
source: http://www.allblogtools.com/tricks-and-hacks/choosing-brilliant-images-for-your-posts/